> ## Documentation Index
> Fetch the complete documentation index at: https://docs.upstackdata.com/llms.txt
> Use this file to discover all available pages before exploring further.
# How to Create a Purchase Goal in Google Ads Using the Google Ads Tag (For Different Interface)
> Create a Google Ads purchase goal using the Google Ads Tag flow (alternate interface) with Enhanced Conversions enabled for use with Upstack Data server-side forwarding.
**Quick Summary**
* In Google Ads, click **Tools and Settings (wrench icon) → Measurement → Conversions** in the top-right.
* Click **"+ Create conversion action"** and select **Website**.
* Choose **Purchase** as the goal and **add a conversion action manually**.
* Name the conversion **"Purchase - UpstackData"** and enable **Enhanced Conversions**.
* **Save** to generate your Conversion ID and Conversion Label.
## Prerequisites
Before you start, you need:
* **Admin** or **Manager** access to a **Google Ads** account
* Permission to create conversion actions in Google Ads
This guide is for the older Google Ads interface that uses **Tools and Settings → Measurement → Conversions**. If your account uses the newer **Goals** menu, follow [How to Create a New Upstack Data Purchase Goal in Google Ads →](/guides/google-ads/how-to-create-a-new-upstack-data-purchase-goal-in-google-ads) instead.
## Setup Instructions
Sign in to [Google Ads](https://ads.google.com) with your Google account.
* In the top-right of Google Ads, click **Tools and Settings (wrench icon)**
* Under **Measurement**, select **Conversions**
* Click **"+ Create conversion action"**
* Select **Website** when prompted
* (Optional) Enter your website domain and click **Scan**
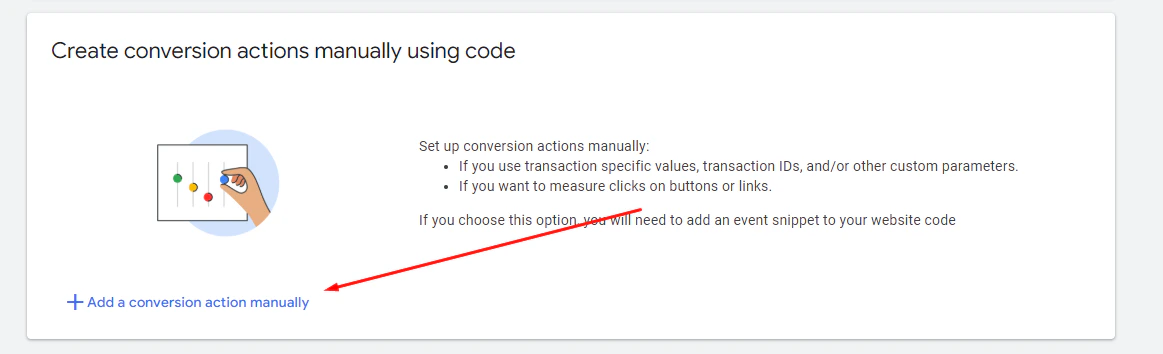
* Choose **"Add a conversion action manually"**
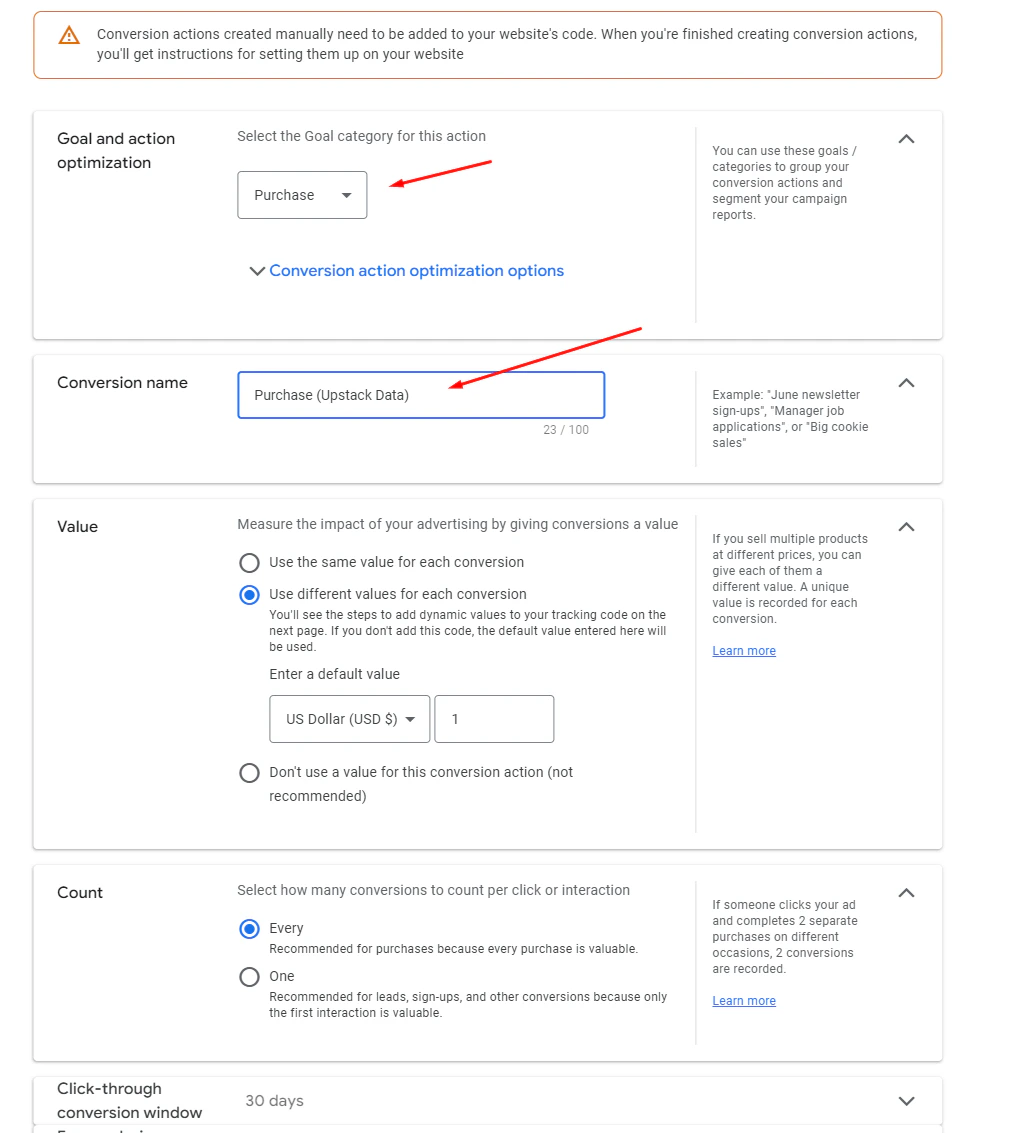
* Select **Purchase** as the goal and conversion action optimization
* Set the **Conversion name** to **"Purchase - UpstackData"**
 Turn on **Enhanced Conversions**, then click **Done**.
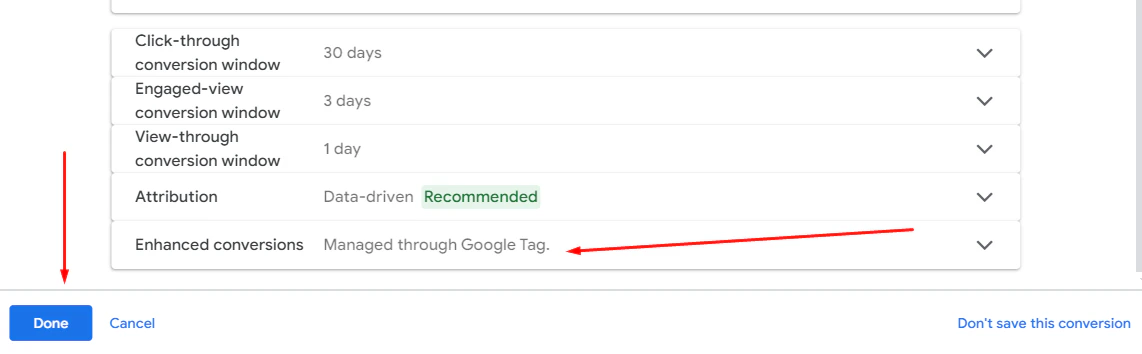 **Note:** Enhanced Conversions improves match rates by using first-party customer data securely.
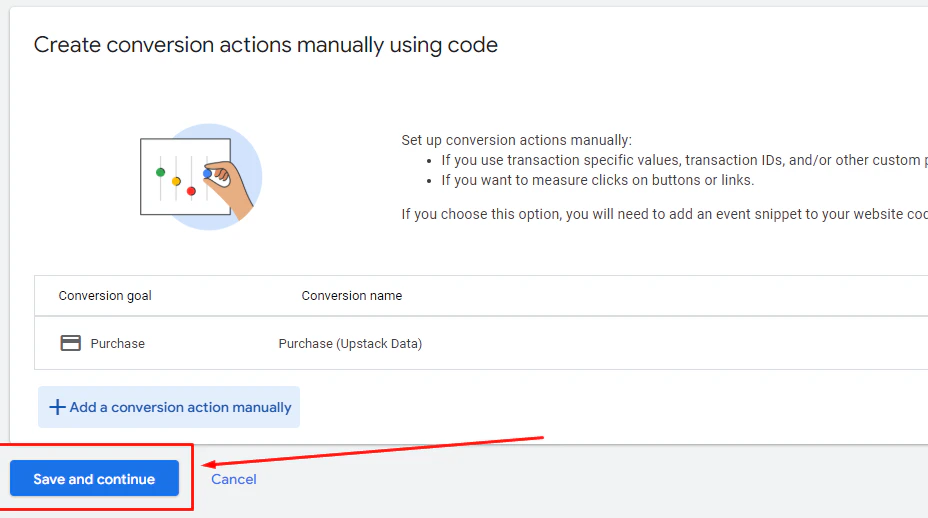
Click **Save and Continue** to complete the setup.
**Note:** Enhanced Conversions improves match rates by using first-party customer data securely.
Click **Save and Continue** to complete the setup.
 *If your Google Ads interface uses the **Goals** menu instead, see:*
\*\*[How to Create a New Upstack Data Purchase Goal in Google Ads →](/guides/google-ads/how-to-create-a-new-upstack-data-purchase-goal-in-google-ads)\*\*
## What You'll Receive
After saving, Google Ads displays:
* **Conversion ID** — starts with `AW-` followed by 9–10 digits (e.g., `AW-123456789`)
* **Conversion Label** — 11-character alphanumeric string (e.g., `ABc1d2EFG3h`)
Use these values in your Upstack Data destination configuration.
## Verify the Setup
To confirm the goal was created correctly:
* Return to **Tools and Settings → Measurement → Conversions** — the new **"Purchase - UpstackData"** conversion should appear in the list.
* Open the conversion and confirm **Enhanced Conversions** is enabled.
If the conversion is missing, refresh the page and confirm you completed the **Save and Continue** step. If issues persist, contact Upstack Data support.
*If your Google Ads interface uses the **Goals** menu instead, see:*
\*\*[How to Create a New Upstack Data Purchase Goal in Google Ads →](/guides/google-ads/how-to-create-a-new-upstack-data-purchase-goal-in-google-ads)\*\*
## What You'll Receive
After saving, Google Ads displays:
* **Conversion ID** — starts with `AW-` followed by 9–10 digits (e.g., `AW-123456789`)
* **Conversion Label** — 11-character alphanumeric string (e.g., `ABc1d2EFG3h`)
Use these values in your Upstack Data destination configuration.
## Verify the Setup
To confirm the goal was created correctly:
* Return to **Tools and Settings → Measurement → Conversions** — the new **"Purchase - UpstackData"** conversion should appear in the list.
* Open the conversion and confirm **Enhanced Conversions** is enabled.
If the conversion is missing, refresh the page and confirm you completed the **Save and Continue** step. If issues persist, contact Upstack Data support.