> ## Documentation Index
> Fetch the complete documentation index at: https://docs.upstackdata.com/llms.txt
> Use this file to discover all available pages before exploring further.
# How to Configure Google Ads Destination in Upstack Data
> Configure the Google Ads destination in Upstack Data with your Conversion ID and Conversion Label to forward server-side purchases with Enhanced Conversions match keys.
**Quick Summary**
* In the Upstack dashboard, click **"+ New Destination"** and select Google Ads.
* In Google Ads, find your conversion under **Goals → Conversions → Summary**.
* Open **Tag Setup** to reveal your **Conversion ID** and **Conversion Label**.
* Paste both values into the Upstack dashboard and **Create Configuration**.
## Tracking Method
**Tracking Method** is set to **Browser + Server** by default, and this is the recommended way to run Google Ads. The two paths work independently — there is no deduplication between them. The browser tag forwards your purchase to the Conversion ID and Conversion Label configured above. The server side is configured separately in **Event Conversion Mappings**, where you can map as many events to conversion actions as you want. If you don't want to load the Google Ads tag in the browser, switch the Tracking Method to **Server**. See [Tracking Method](/concepts/tracking-method).
## Prerequisites
Before you start, you need:
* An active Upstack Data account ([sign up](https://app.upstackdata.com))
* **Admin** or **Manager** access to a **Google Ads** account
* An existing **Purchase conversion action** in Google Ads (or follow [How to Create a New Upstack Data Purchase Goal in Google Ads](/destinations/catalog/google-ads/how-to-create-a-new-upstack-data-purchase-goal-in-google-ads) first)
## Configuration Steps
Sign in to Upstack Data at [app.upstackdata.com](https://app.upstackdata.com).
* In the Upstack dashboard, navigate to **Events Destination** ([app.upstackdata.com/pixel/event-destinations](https://app.upstackdata.com/pixel/event-destinations))
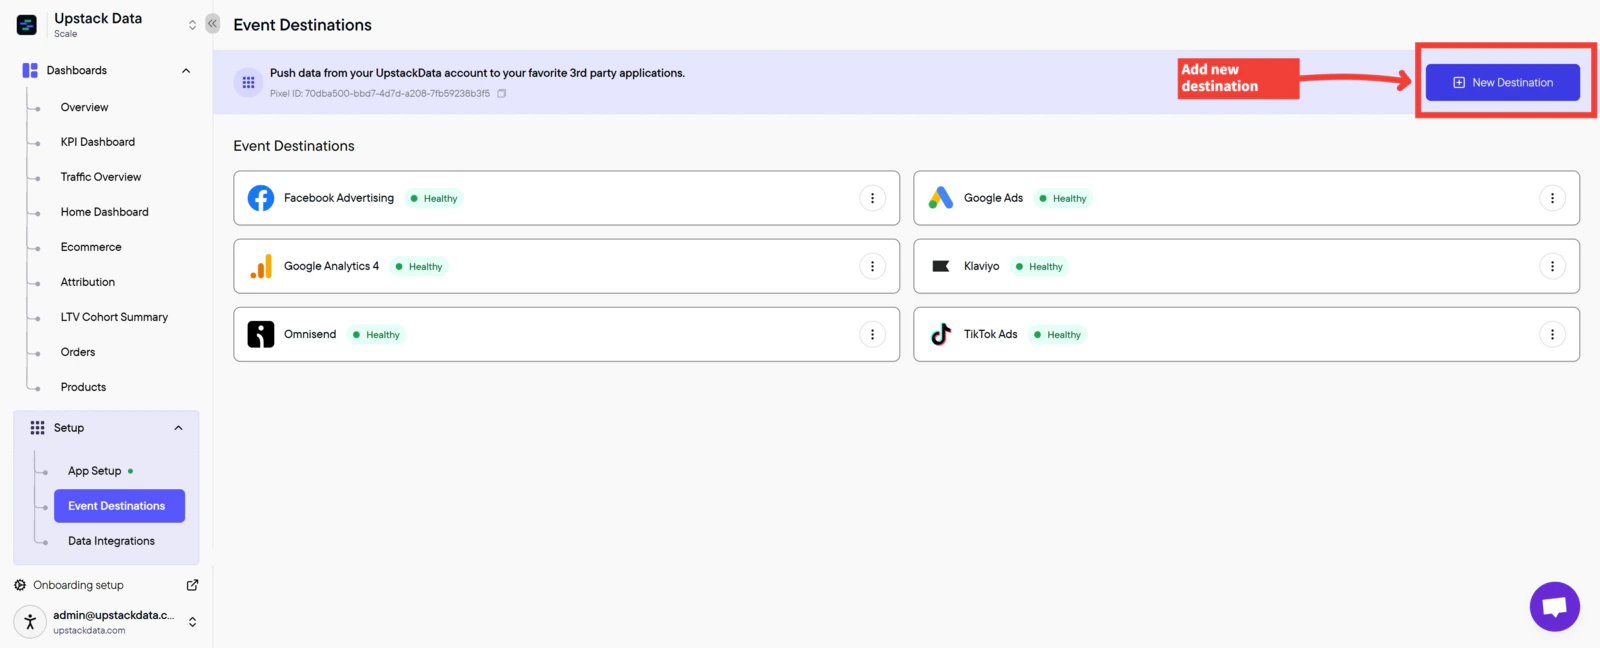
* Click **"+ New Destination"** in the top-right corner of the page
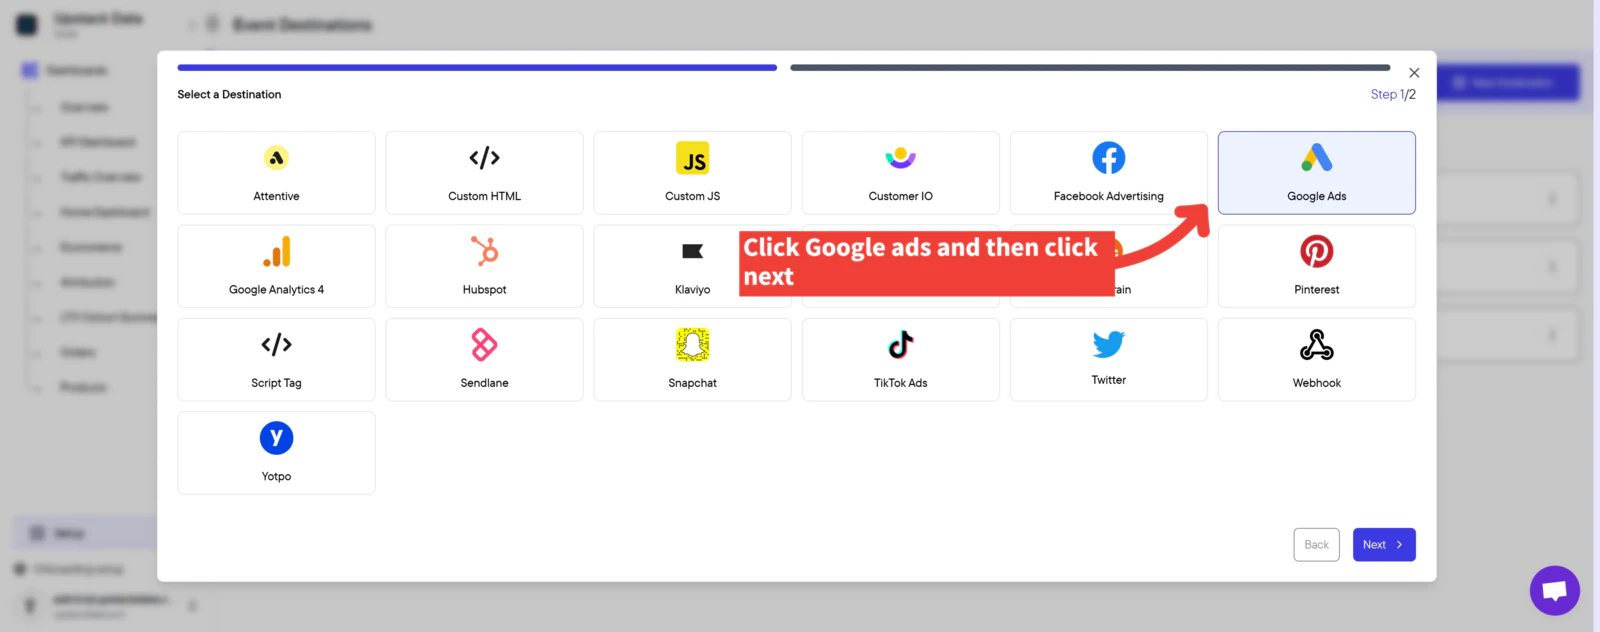
 * In the **Select a Destination** popup, click **"Google Ads"**
* Click **Next**
* In the **Select a Destination** popup, click **"Google Ads"**
* Click **Next**
 * In a new tab, sign in to [Google Ads](https://ads.google.com)
* In the left-hand menu, navigate to **Goals → Conversions → Summary**
* In a new tab, sign in to [Google Ads](https://ads.google.com)
* In the left-hand menu, navigate to **Goals → Conversions → Summary**
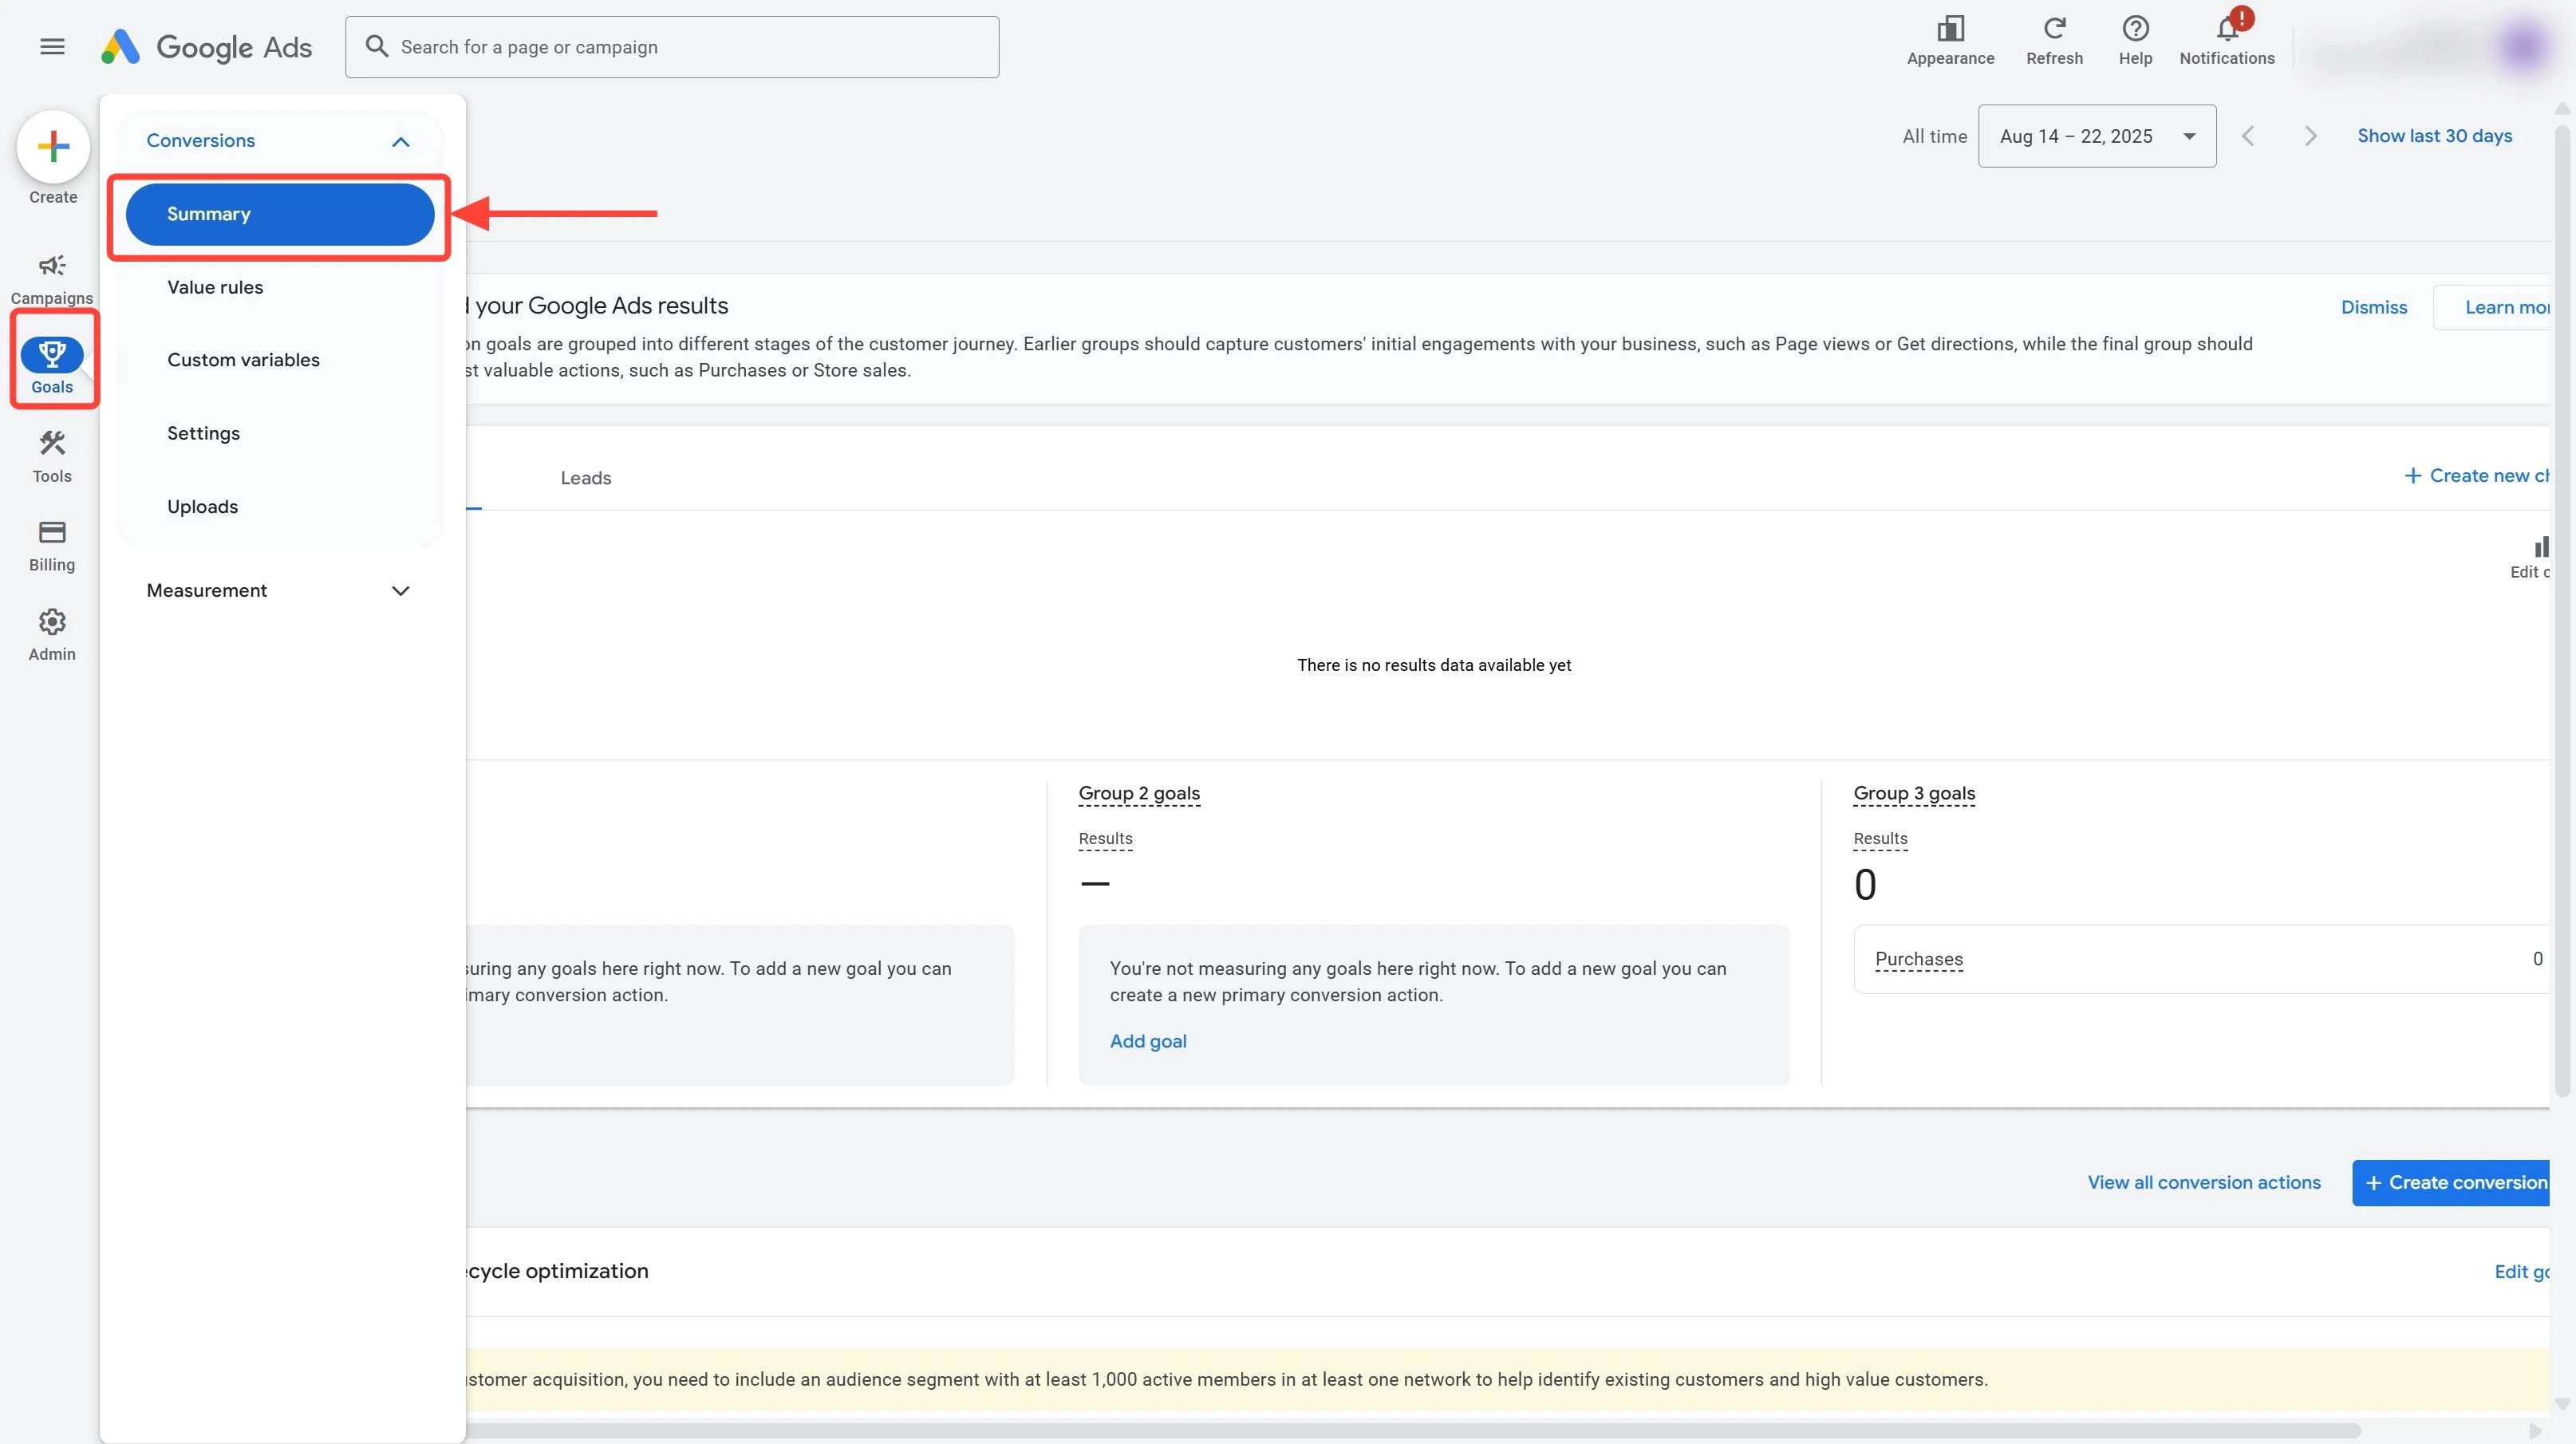 *`Google Ads Conversions Summary Page`*
Find your primary Purchase conversion (usually named **"Purchase - UpstackData"**) and click to open it.
*`Google Ads Conversions Summary Page`*
Find your primary Purchase conversion (usually named **"Purchase - UpstackData"**) and click to open it.
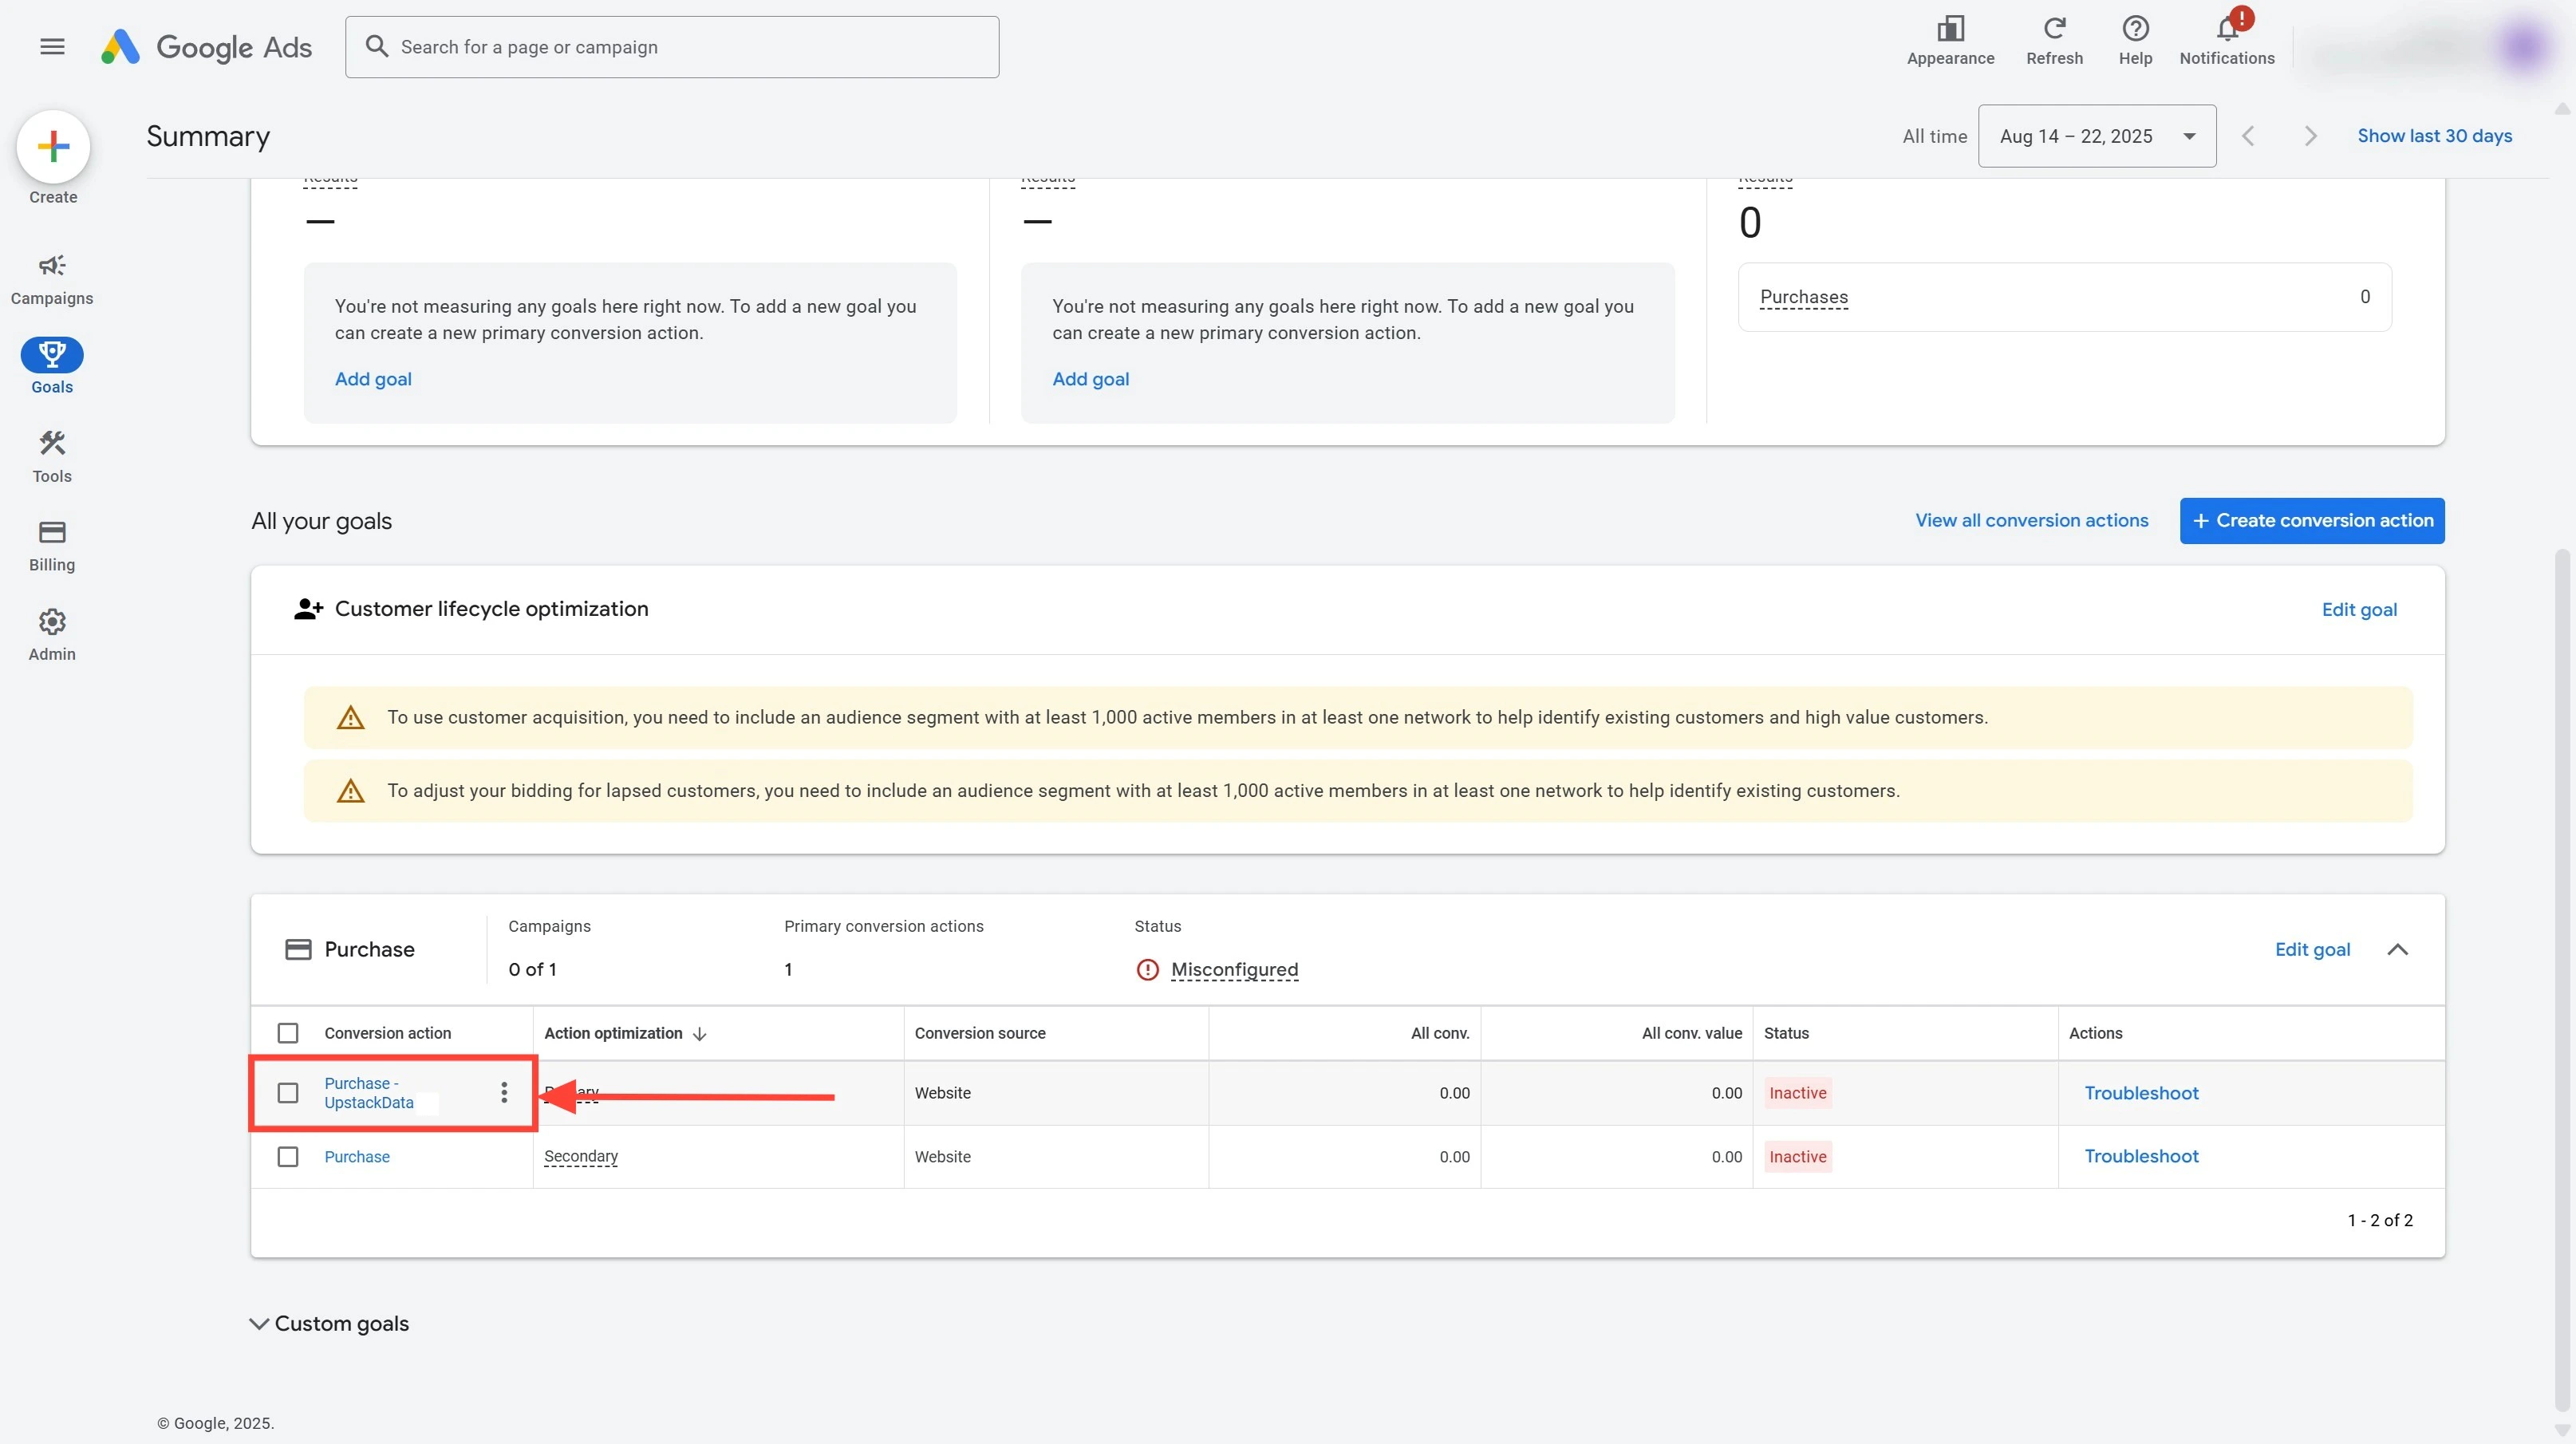 *`Example Primary Conversion Event`*
**Note:** Your conversion may be named differently. Look for the primary event linked to your purchase conversion.
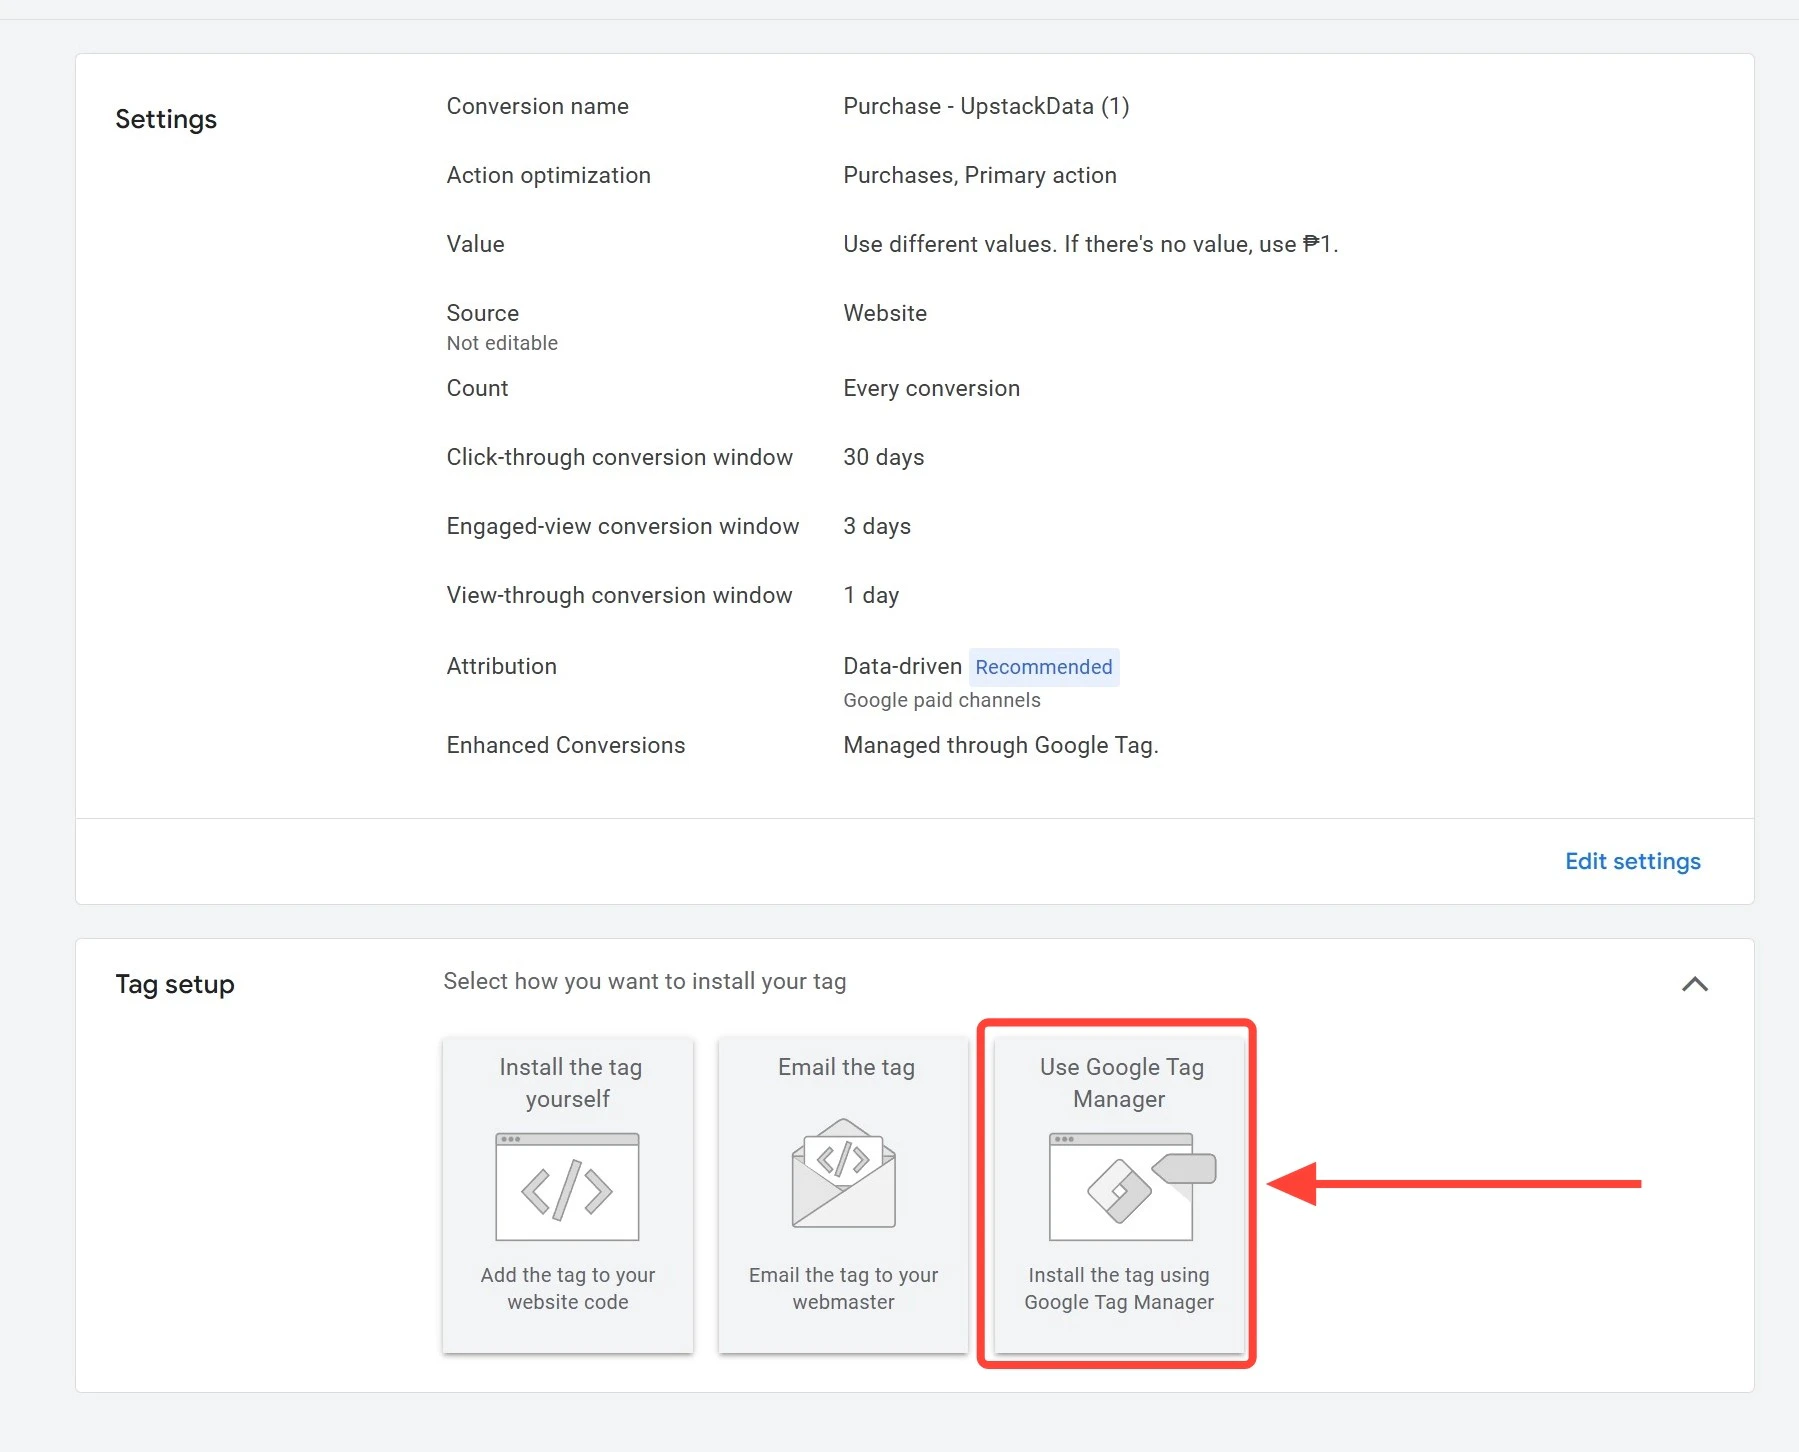
On the conversion detail page, scroll down to the **Tag Setup** section and click **"Use Google Tag Manager"**.
For a step-by-step walkthrough, see [How to Get Your Google Ads Conversion ID and Label →](/destinations/catalog/google-ads/how-to-get-your-google-ads-conversion-id-and-label).
*`Example Primary Conversion Event`*
**Note:** Your conversion may be named differently. Look for the primary event linked to your purchase conversion.
On the conversion detail page, scroll down to the **Tag Setup** section and click **"Use Google Tag Manager"**.
For a step-by-step walkthrough, see [How to Get Your Google Ads Conversion ID and Label →](/destinations/catalog/google-ads/how-to-get-your-google-ads-conversion-id-and-label).
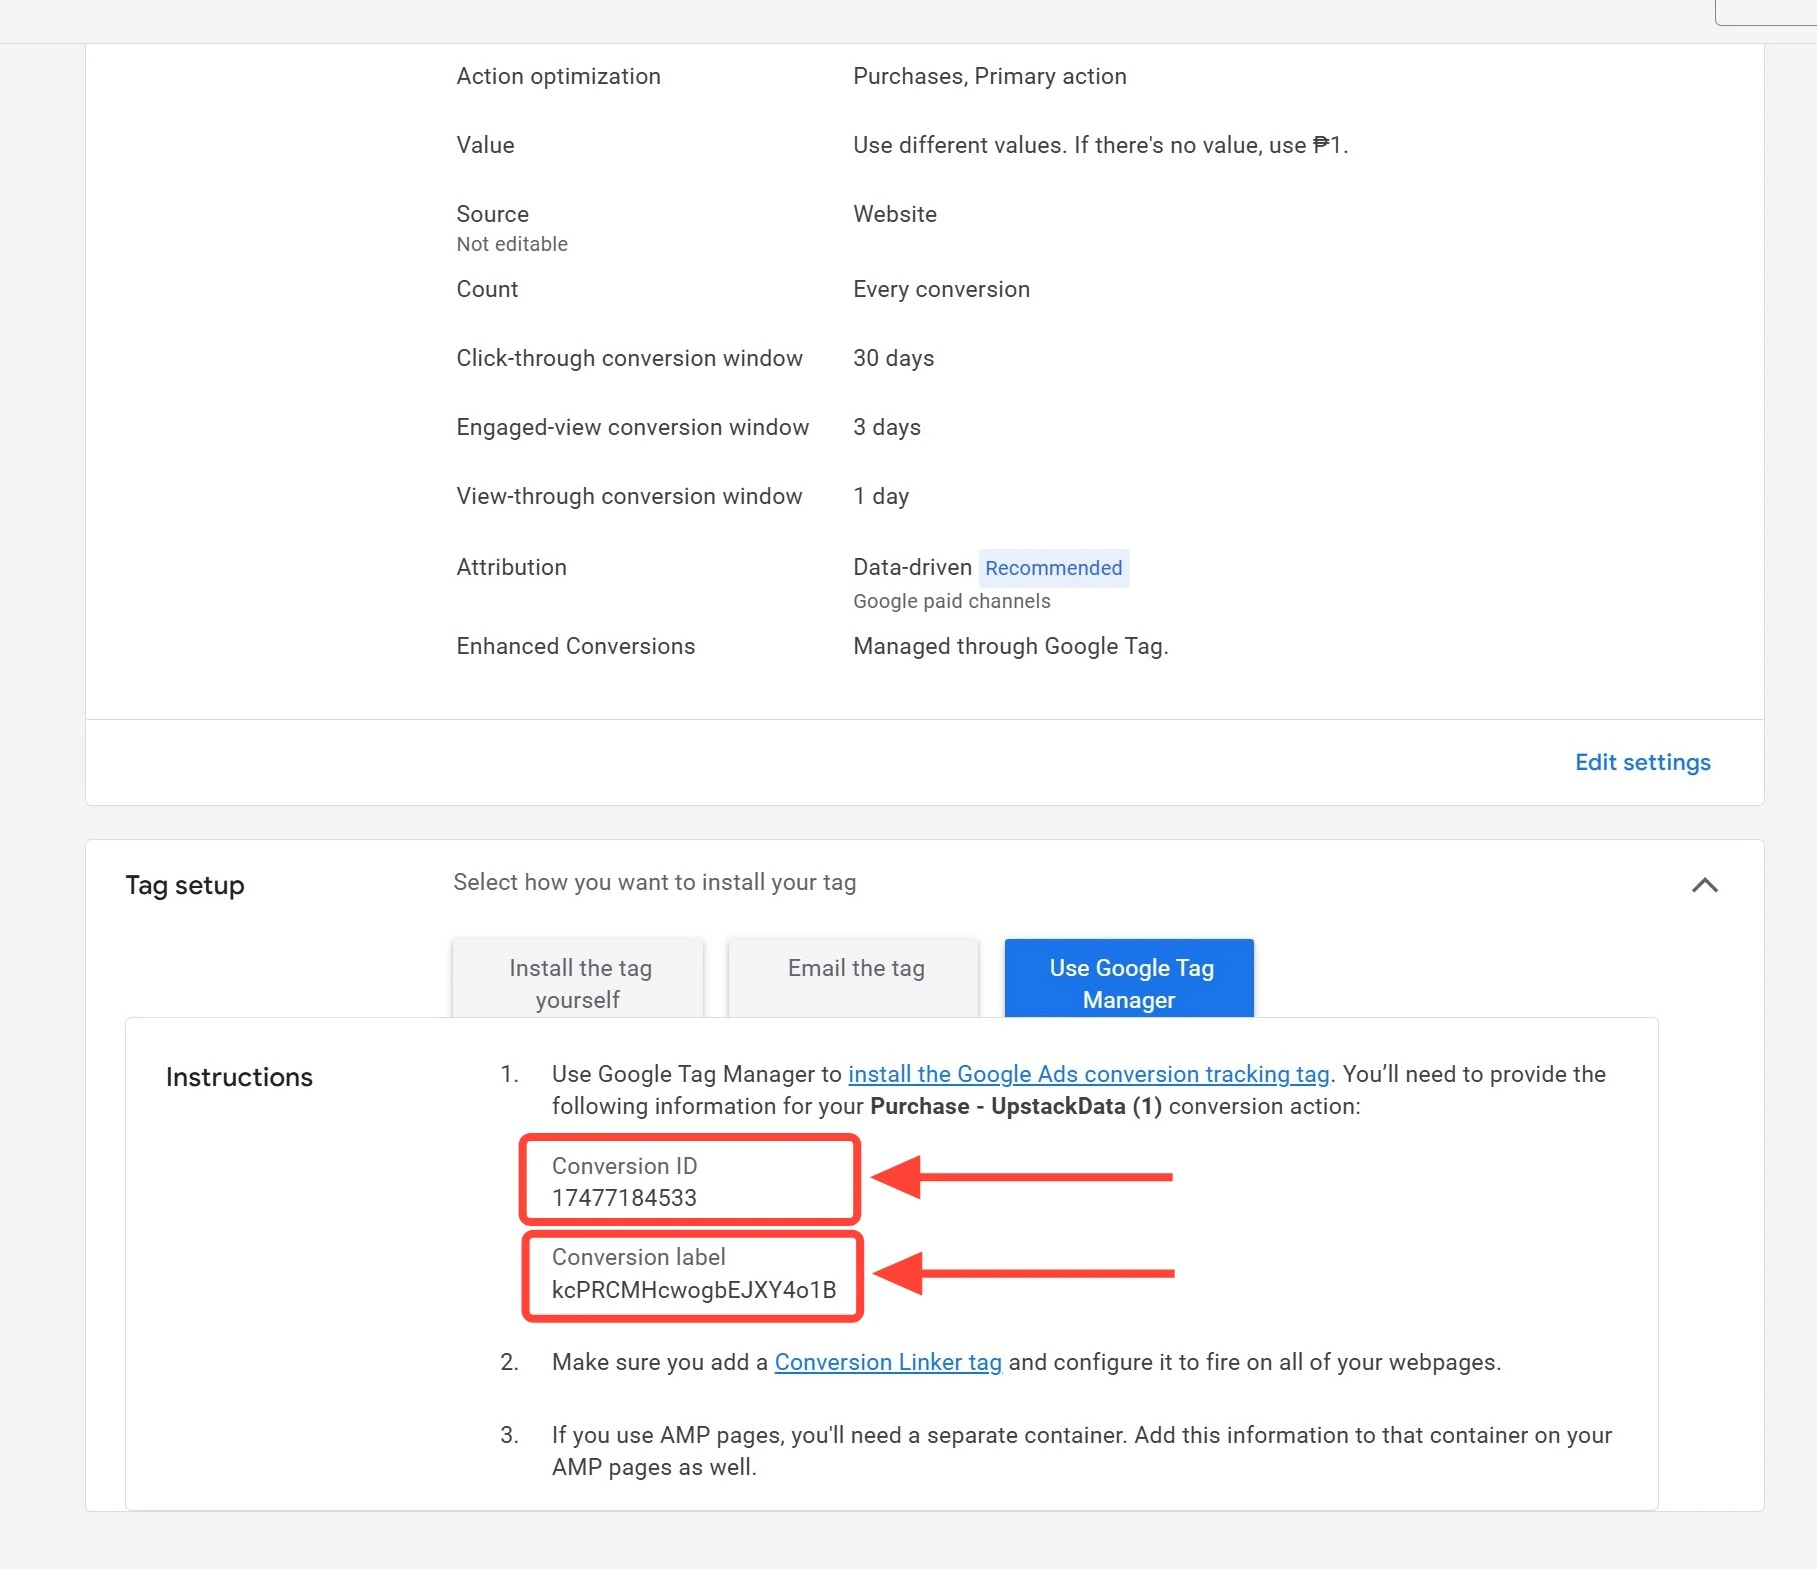
 Google Ads displays your **Conversion ID** and **Conversion Label**.
* **Conversion ID** — starts with `AW-` followed by 9–10 digits (e.g., `AW-123456789`)
* **Conversion Label** — 11-character alphanumeric string (e.g., `ABc1d2EFG3h`)
Google Ads displays your **Conversion ID** and **Conversion Label**.
* **Conversion ID** — starts with `AW-` followed by 9–10 digits (e.g., `AW-123456789`)
* **Conversion Label** — 11-character alphanumeric string (e.g., `ABc1d2EFG3h`)
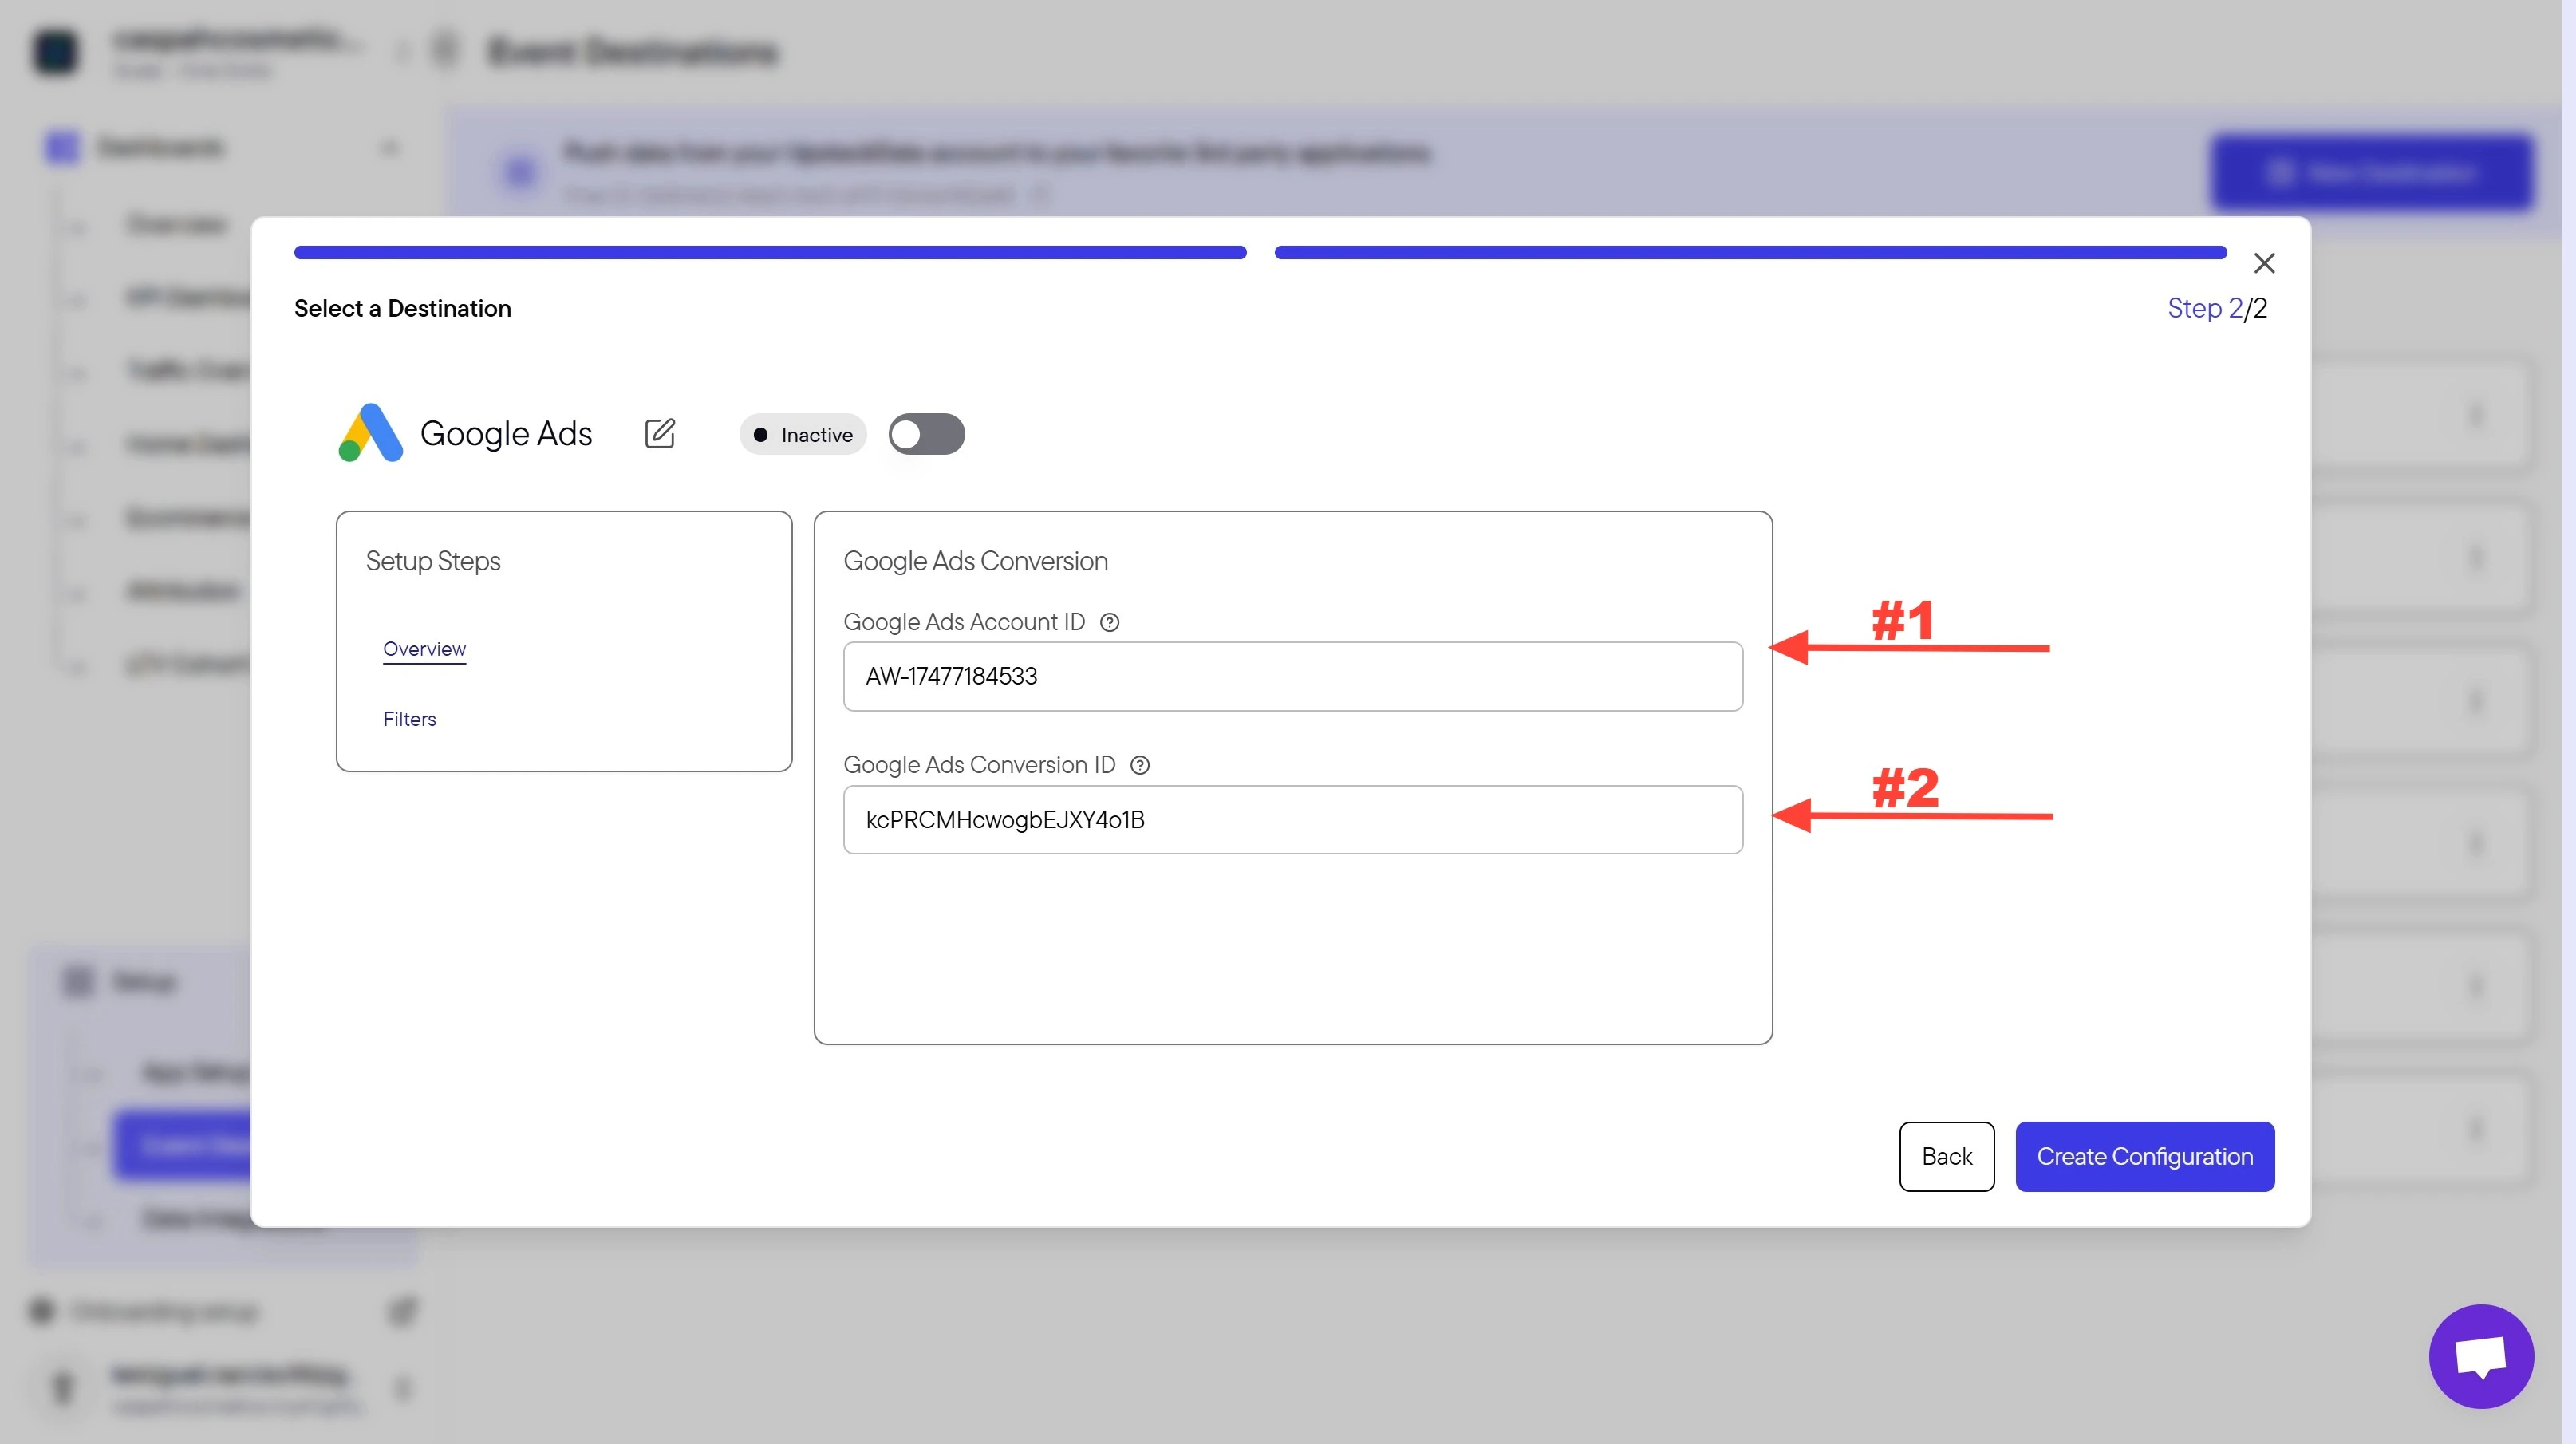
 Back in the Upstack dashboard:
* In the **Conversion ID** field, paste your full Conversion ID from Google Ads (e.g., `AW-123456789`). The `AW-` prefix is required.
* In the **Conversion Label** field, paste your Conversion Label from Google Ads (e.g., `ABc1d2EFG3h`).
Back in the Upstack dashboard:
* In the **Conversion ID** field, paste your full Conversion ID from Google Ads (e.g., `AW-123456789`). The `AW-` prefix is required.
* In the **Conversion Label** field, paste your Conversion Label from Google Ads (e.g., `ABc1d2EFG3h`).
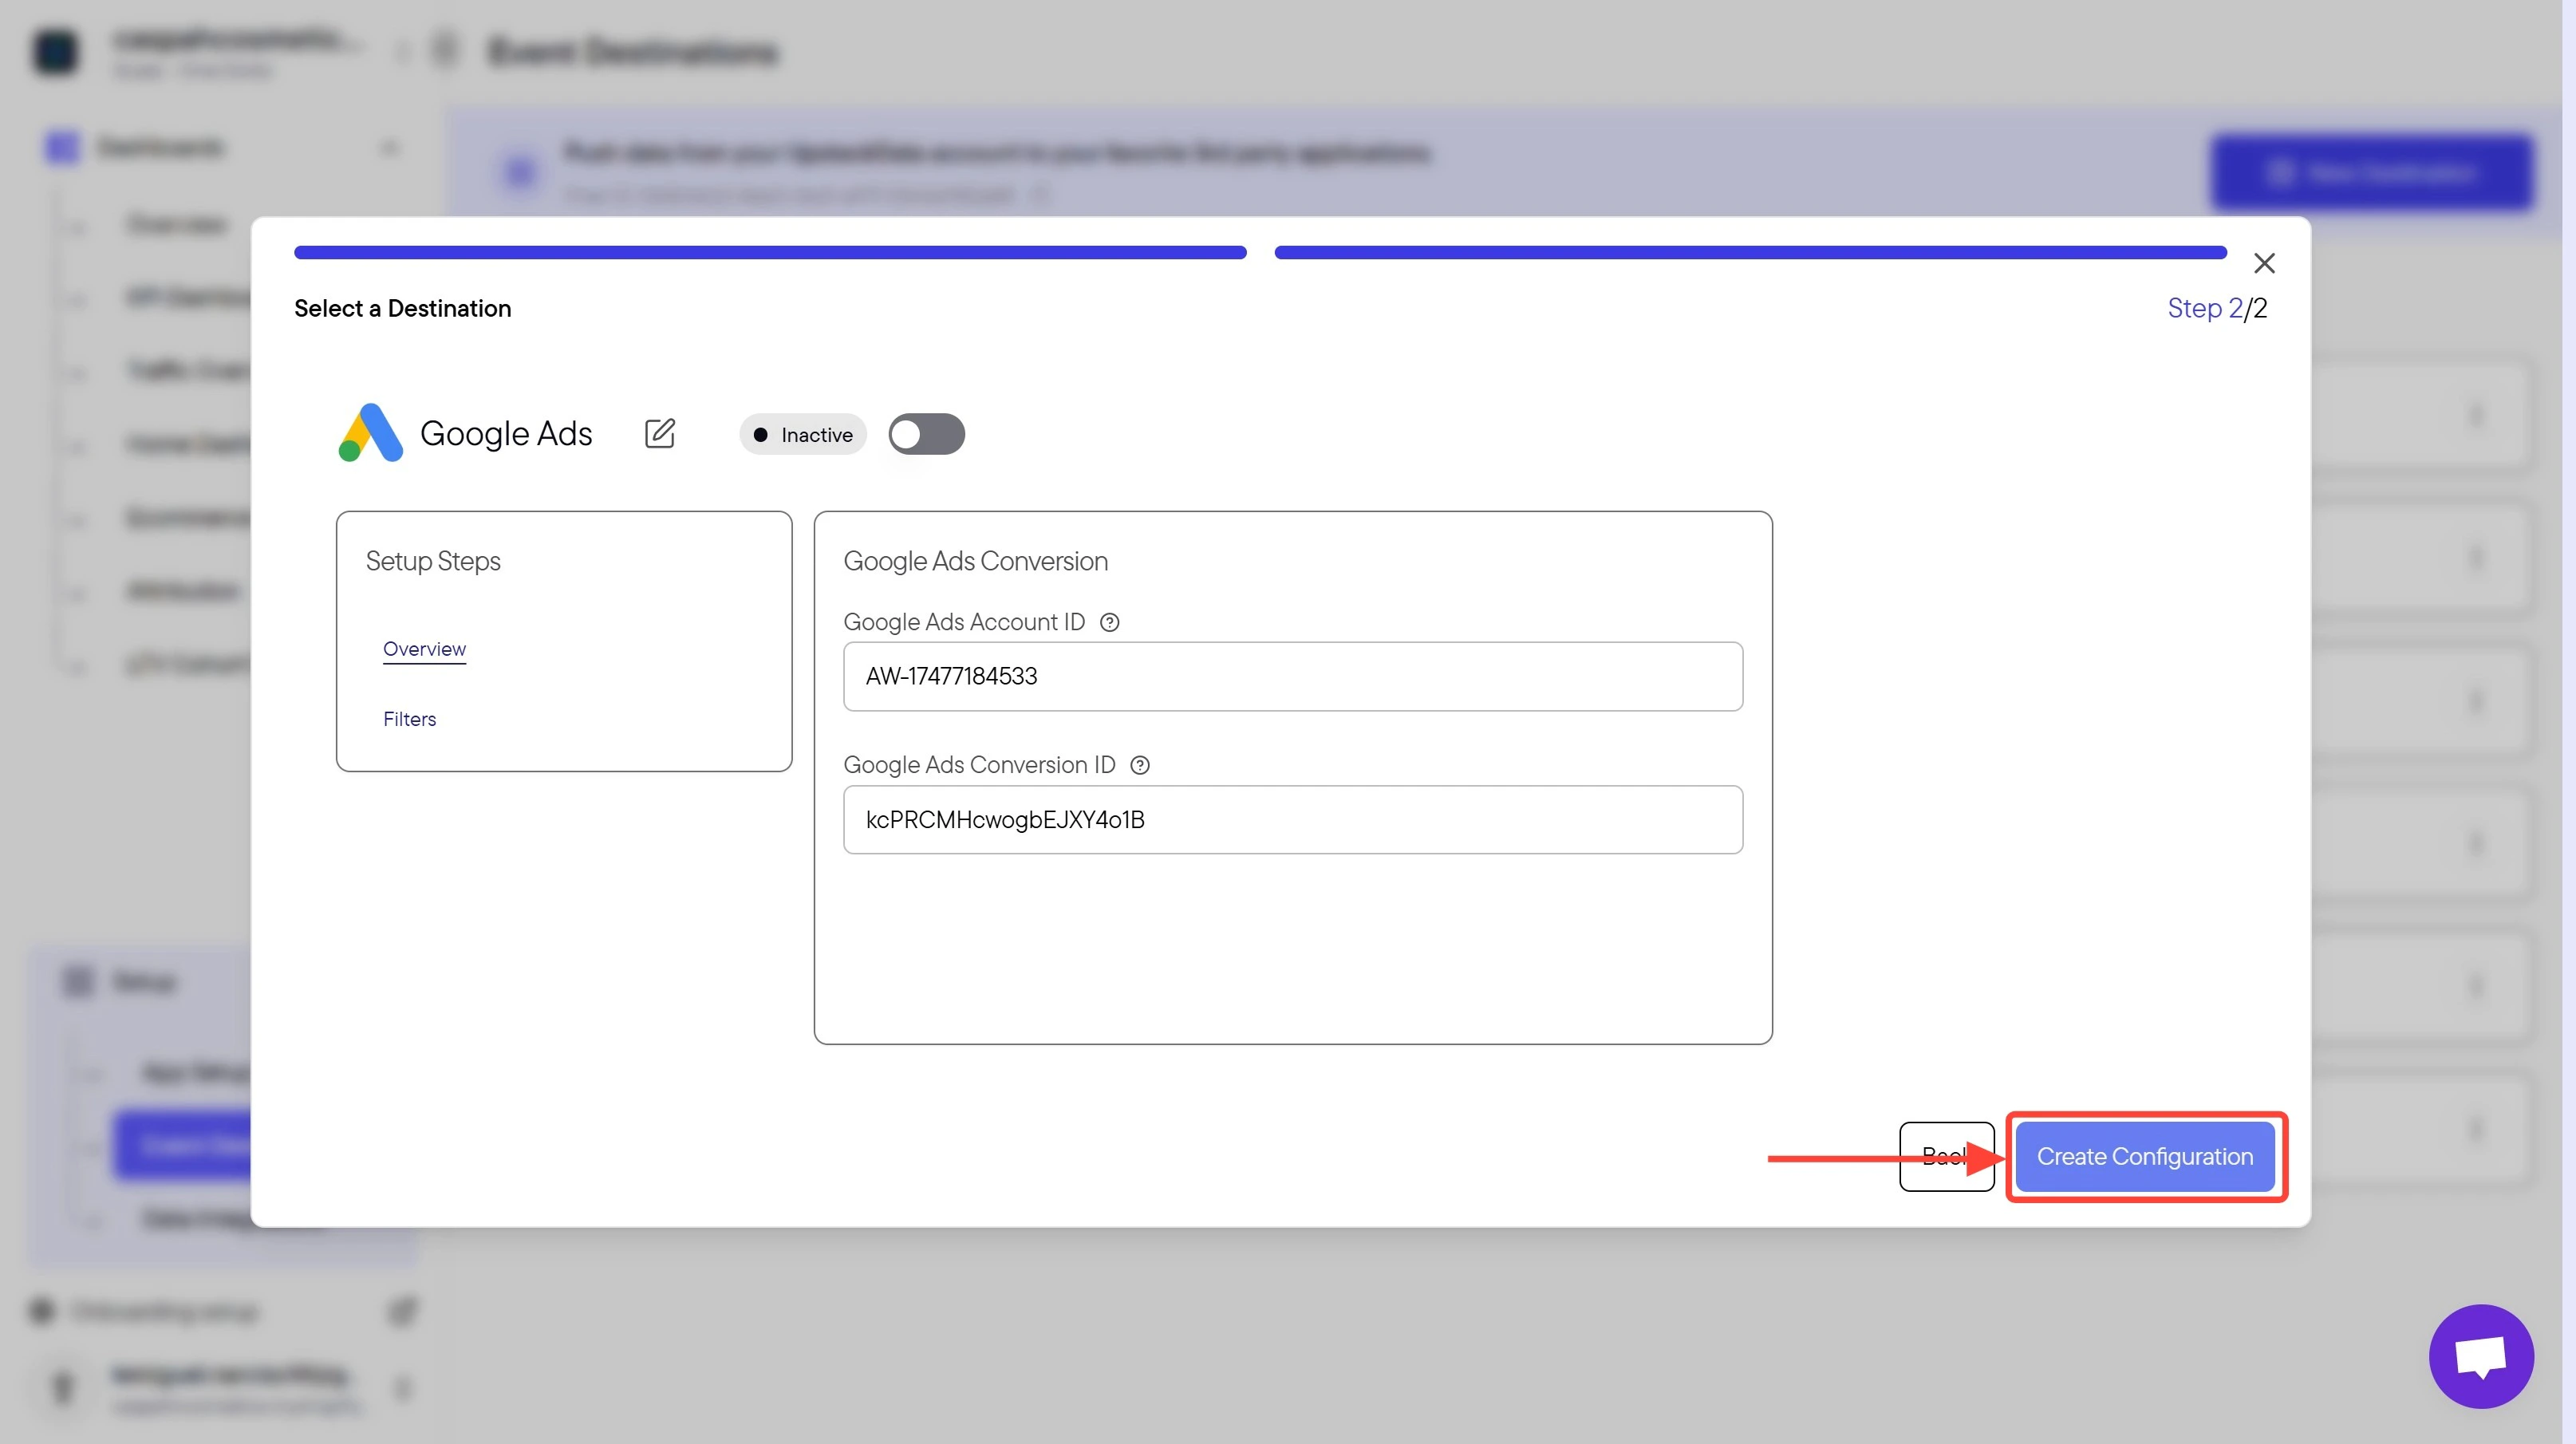
 Click the **Create Configuration** button to save the setup.
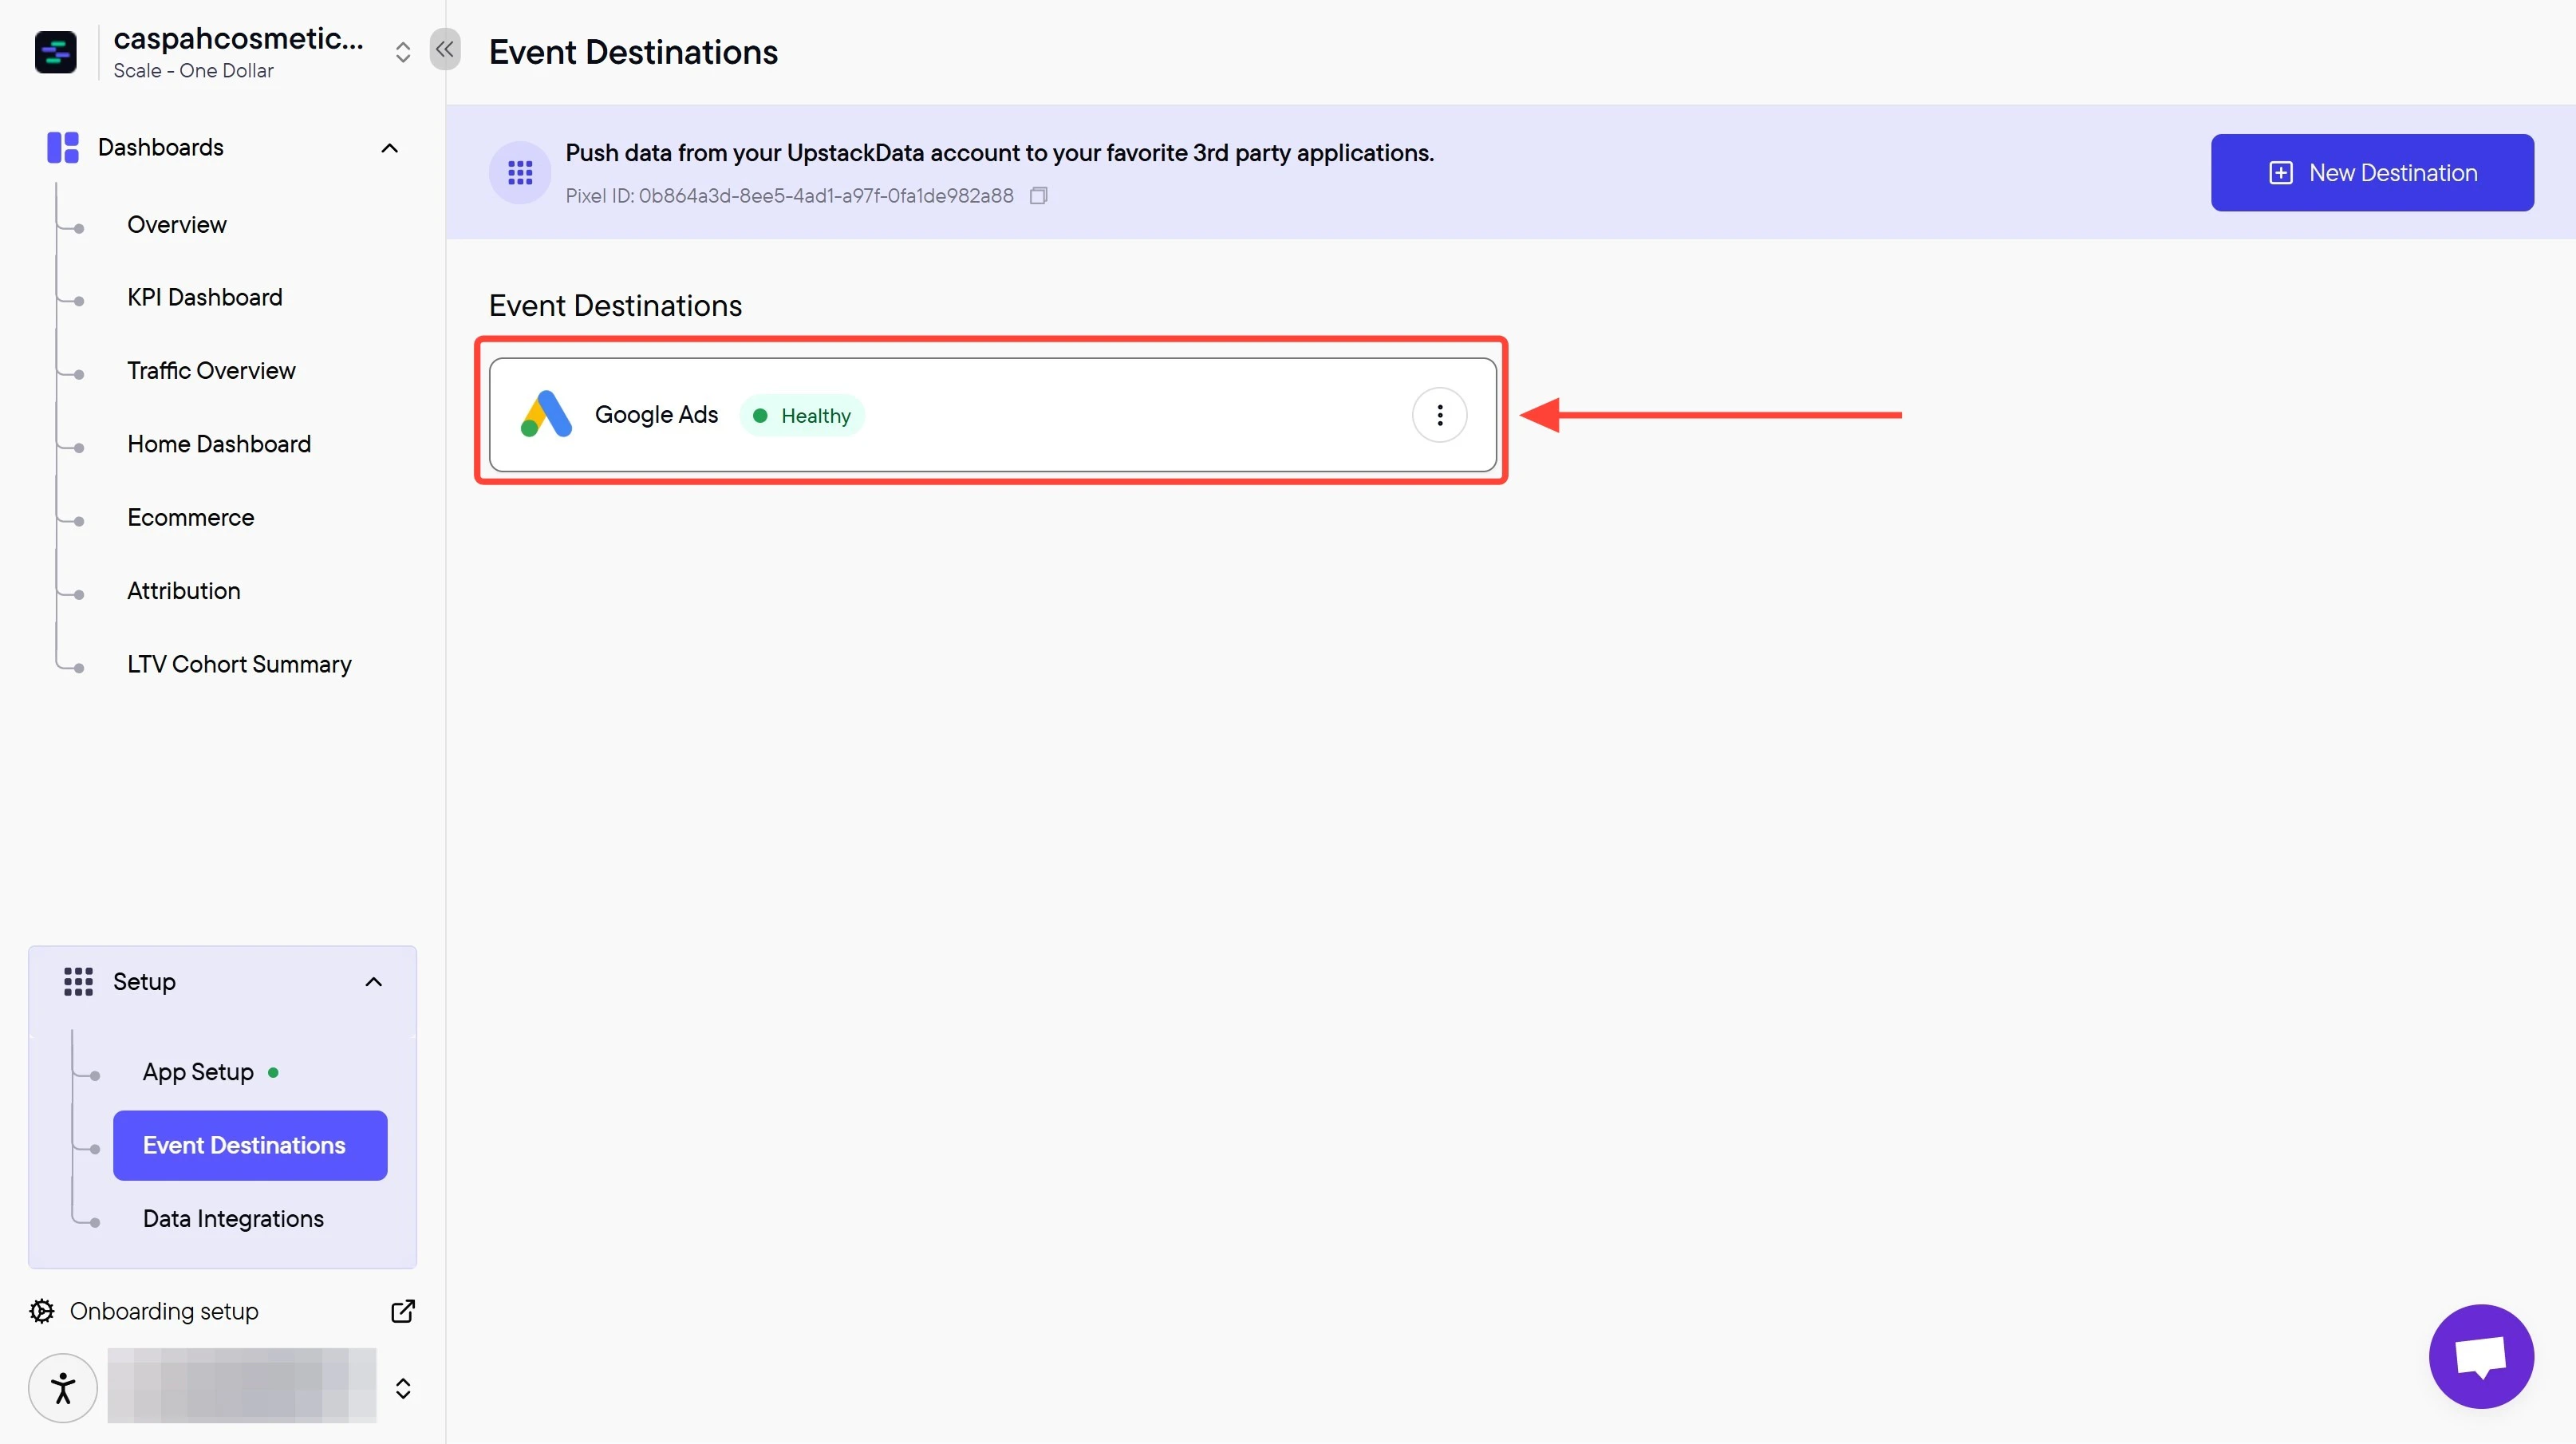
 **Success! 🎉** You should see a confirmation message and the Google Ads destination will appear as **"Healthy"** in your destinations list.
 ## Verify the Setup
To confirm the destination is working:
* In the Upstack dashboard, the Google Ads destination should show **Healthy** status under **Events Destination**.
* Place a test order on your store and check Google Ads **Goals → Conversions → Summary** within 24–48 hours to confirm the conversion is recorded.
If the destination shows **Unhealthy** or no conversions arrive, double-check that:
* The **Conversion ID** starts with `AW-` and matches the value shown in Google Ads.
* The **Conversion Label** was copied without leading or trailing spaces.
* The conversion action in Google Ads is enabled and not paused.
If issues persist, contact Upstack Data support with your **Conversion ID** and **Conversion Label**.
## Verify the Setup
To confirm the destination is working:
* In the Upstack dashboard, the Google Ads destination should show **Healthy** status under **Events Destination**.
* Place a test order on your store and check Google Ads **Goals → Conversions → Summary** within 24–48 hours to confirm the conversion is recorded.
If the destination shows **Unhealthy** or no conversions arrive, double-check that:
* The **Conversion ID** starts with `AW-` and matches the value shown in Google Ads.
* The **Conversion Label** was copied without leading or trailing spaces.
* The conversion action in Google Ads is enabled and not paused.
If issues persist, contact Upstack Data support with your **Conversion ID** and **Conversion Label**.